Introduction
Simple Aim Assist is your ultimate solution for precising aiming in gaming.
The plugin is designed to enhance the targeting accuracy and reaction time of the player, allowing him to
focus more on the strategy and gameplay elements of your game.
With tweakable settings, easy installation and a Firing Range to fine-tune the gamefeel experience you want.
Aim Assist Plugin offers a seamless and reliable experience for both casual and competitive players.
Key Features: Actor Component, Stickiness, Bullet Magnetism, Camera Magnetism, Camera Snap & Locked on target, Dynamic Assist Zones, Firing Range.
Installation
Since the plugin is only in Blueprint, the installation process is straightforward: you only have to install it to your project once bought to the marketplace.
Getting Started
Designed for simplicity, Simple Aim Assist seamlessly integrates with Actor Components.
One component to attach to the player: AAA_BP_AimAssistComponent
Once you've added the component to the player, follow these three easy steps to set it up. You can refer to AAA_BP_FirstPersonPlayer, where all the setup parts are highlighted in Blue Cyan comments.
1. In your Camera Look input Event, you need to update the input direction from the aim
assist as shown below.
To ensure the stickiness feature works properly, apply the Aim Assist Deceleration Rate to the
final rotation.
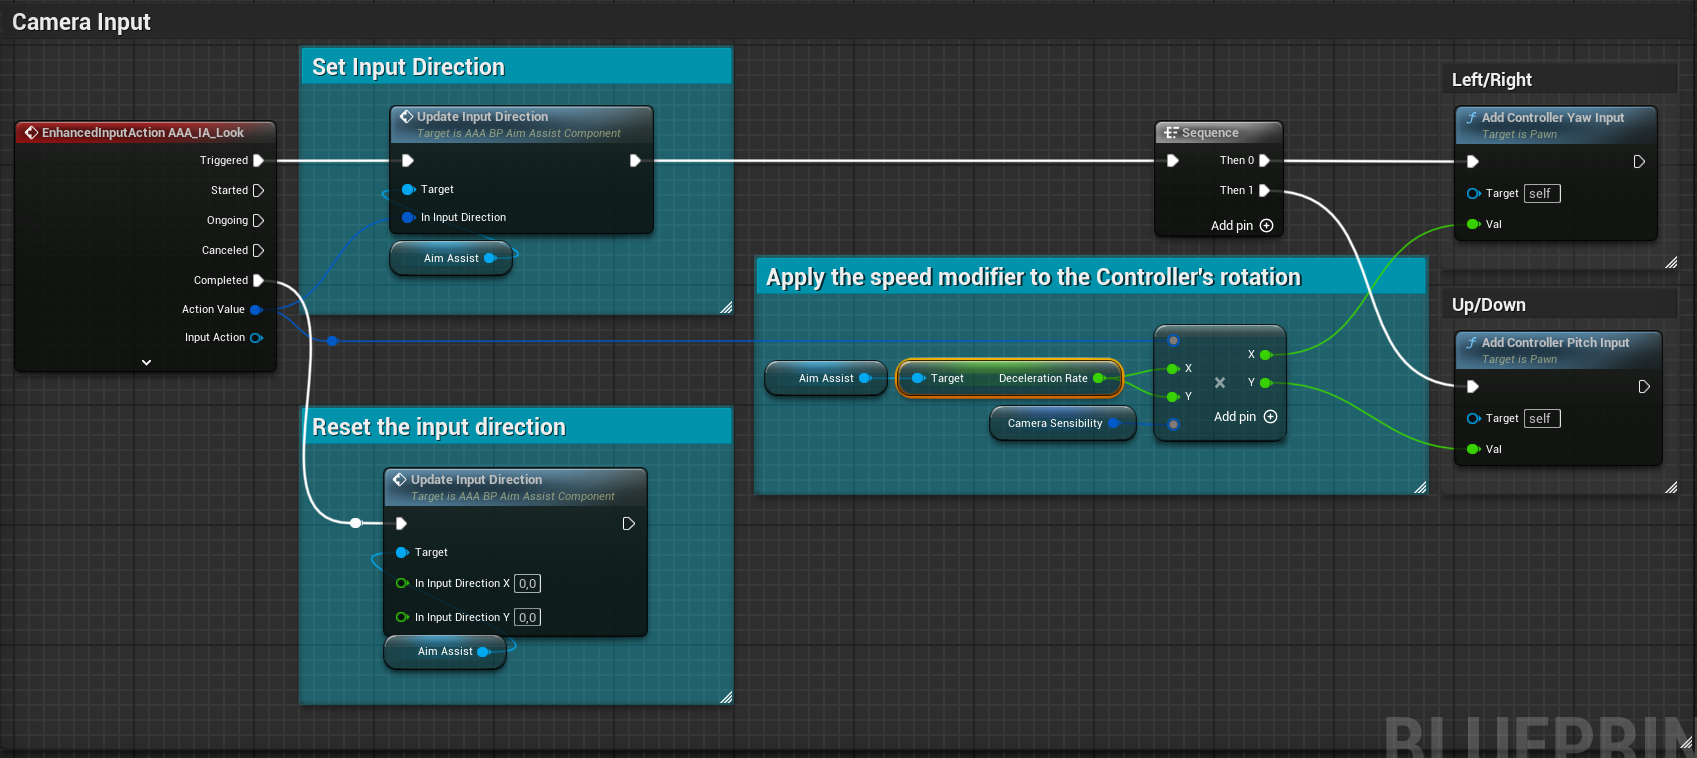
Note: The Camera Sensitivity variable allows you to adjust the camera's rotation sensitivity, giving you the flexibility to fine-tune the camera's responsiveness to your preference. You can choose whether or not to create this variable based on your specific needs.
2. In your Shoot input Event, before triggering your Shooting Logic, make sure to call the Adjust
Impact Point function from the Aim Assist.
This function will provide you with a new impact direction that should be used in your shooting logic to
improve accuracy.
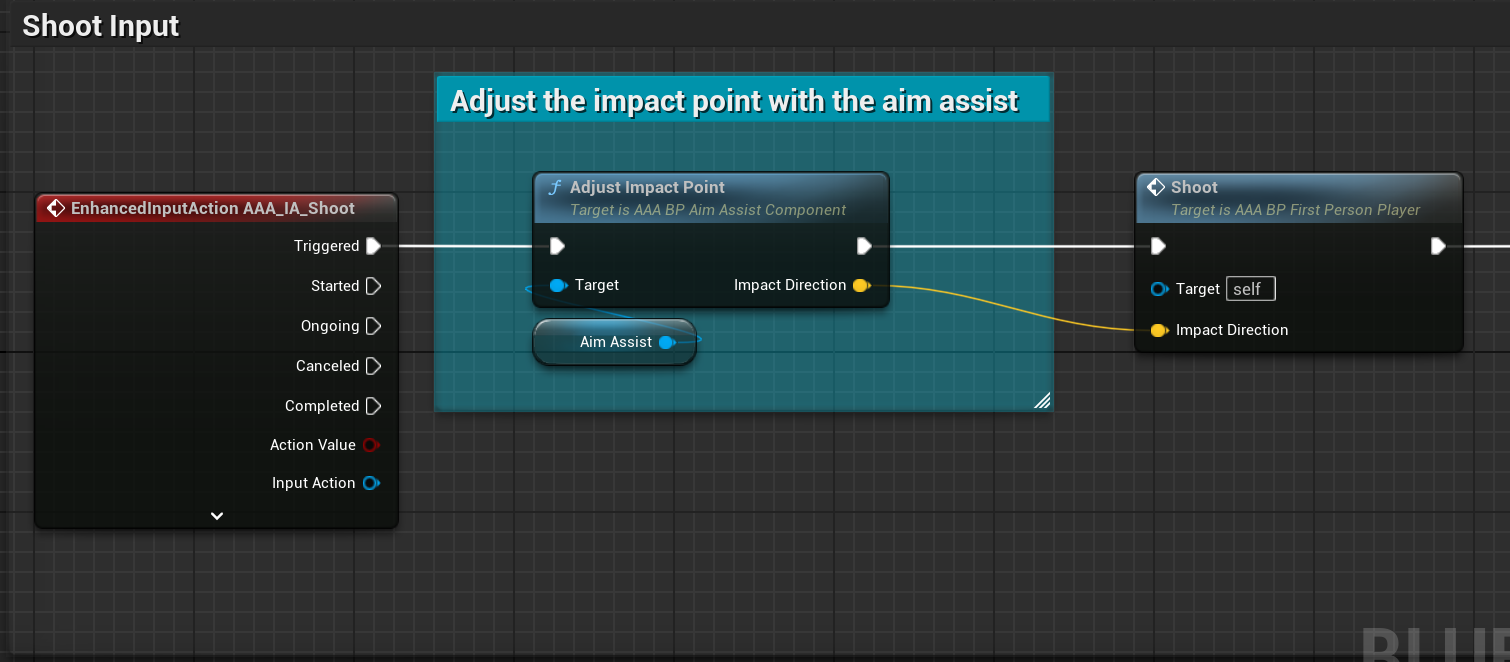
Note: Even if Bullet Magnetism or the Aim Assist are disabled, the "Adjust Impact Point" function will still return the required impact point, without any adjustments.
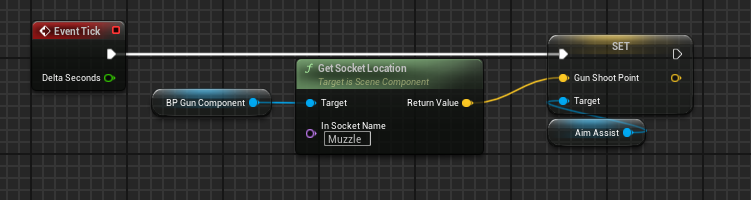
3. In your tick function, update the GunShootPoint location of the Aim Assist Component.
This prevents the Aim assist from snapping to targets that are too close to the player.
⚠️ Without this step, the Aim Assist won't work.
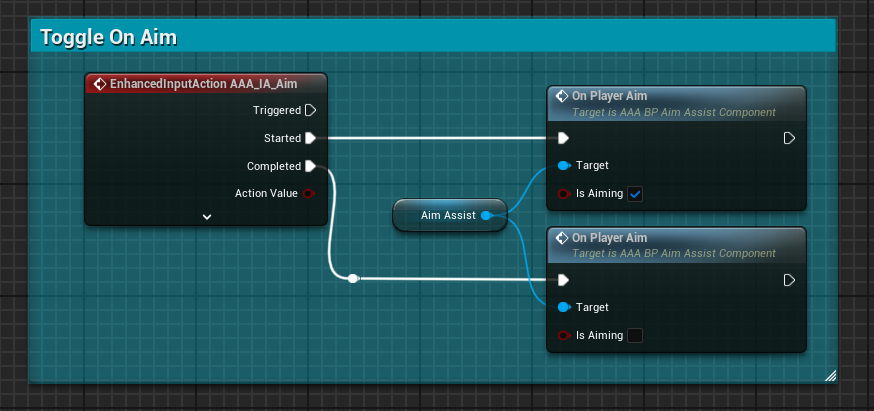
4. The final step is to trigger On Player Aim whenever the player starts or stops aiming.
This will enable or disable the Aim Assist based on whether the player is aiming or not.
Parameters Guide
Enable Aim Assist
Enable / Disable the aim assist.
Enable Snap On Aim
If enabled, the camera will snap to the target if within the "Camera Snap Assist Zone" when the player starts aiming.
Enable Camera Magnetism
If enabled, the camera will slowly move toward the current target, but only when the player's Aim Velocity is not near zero.
Enable Camera Stickiness
If enabled, the camera rotation speed will gradually decrease if the target is within the "Stickiness
Assist Zone", in correlation with the distance between the center of the screen and the target.
Enable Bullet Magnetism
If enabled, the impact point of the bullet will be adjusted when the player is shooting and if the target is
within the
"Bullet Magnetism Assist Zone."
Bullet Magnetism Radius
The radius of the Bullet Magnetism Assist Zone.
Camera Magnetism Radius
The radius of the Camera Snap Assist Zone.
Camera Stickiness Radius
The radius of the Stickiness Assist Zone.
Adjusted X Radius
The new radius of the corresponding Assist Zones. The radius is dynamically updated depending on how far the
target is from the player in 3D space.
Sphere Trace Offset Radius
The offset to start the sphere trace at the muzzle of the weapon.
This is mostly useful for third-person shooters (TPS).
For first-person shooters (FPS), it is recommended to leave this variable at 1.
Aim Assist Range
The range of the aim assist, if the target distance is outside range the aim assist will not be triggered.
This variable should be the same as the weapon range.
Camera Magnetic Strength
Controls the strength of the magnetism effect to pull the camera torawrd the target.
Camera Snap Strength
Controls how strongly the camera snap toward the target.
Lock State Duration
The duration of the lock state.
The lock state occurs only during a snap; locking the camera on the current target and slightly following its movement.
If the player move the camera the Sna & the lock state stop.
Camera Deceleration Multiplier
This value ranges between 0 and 2.
The higher this value is, the more the camera will decelerate when within the Stickiness Assist Zone.
Min Clamp Deceleration Speed
What's the minimum speed that can reach the camera when in the Stickiness zone.