Introduction
Advanced Quest is your companion for crafting and designing quests with efficiency!
Say goodbye to manual quest implementation—the plugin streamlines the process.
The system is extensible, allowing unlimited objective types. Your only limit is your imagination!
It works seamlessly with Player Channels and delegates for optimal performance.
No tags, no hard-references; classes are intentionally decoupled for minimal dependencies and enhanced
modularity.
Key Features: Data Assets, Save & Load, Unlimited Objectives, Quest Giver & Receiver, Rewards, UI, and way more ...
Installation
Since the plugin is built entirely in Blueprint, the installation process is straightforward: you only need to install it in your project after purchasing it from the marketplace.
Tips: If your project is a Blueprint Project and you wish to modify the plugin's code, you can go in the editor to: Tools->Create new C++ (the specific class doesn't matter). This action will generate a Source Folder with necessary files for a C++ project. Afterward, simply restart the engine.
Project Setup
The plugin's default settings store each created quest in AdvancedQuestContent/Blueprints/Quests.
You can modify this path within the AQ_EUW_CustomQuestTool Editor Utility Widget, located in
AdvancedQuestContent/Tools/QuestTool.
(Ctrl + P to search for it)
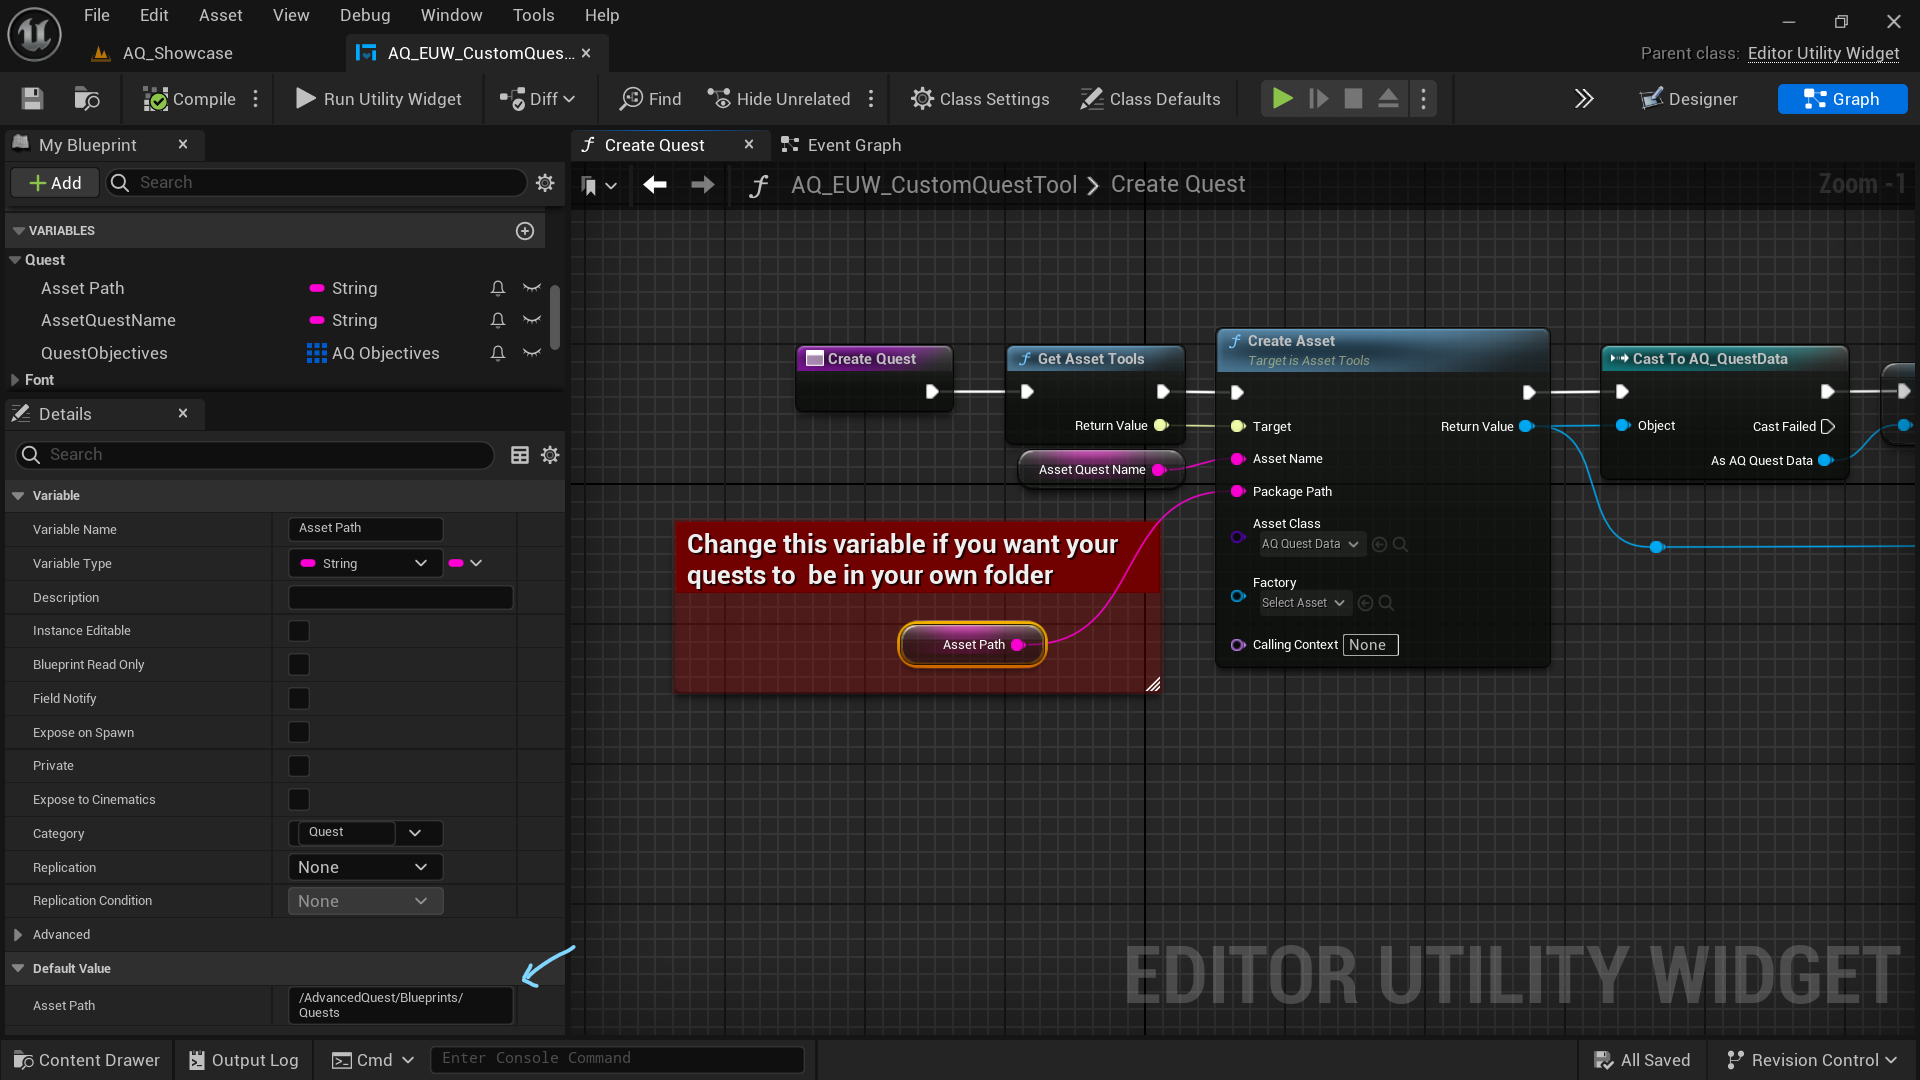
Modify the Asset Path variable to your desired Path. The path must begins with
/Game/ if you want to place it in your project folder.
For instance: /Game/Blueprints/Quests/
Note: The "/Game/" notation represents the "Content" folder, so there's no need to explicitly include "Content" in the path.
Tips: It can be inconvenient when all the plugin's quests appears when using the Ctrl + P shortcut to search through the project. To address this, you can streamline your search by excluding plugin content and engine content. Click on the Gear icon (settings) and uncheck "Show Engine Content" and "Show Plugin Content".
Getting Started
Designed for simplicity, Advanced Quest seamlessly integrates with Actor Components.
Two components to attach to the player: AQ_BP_PlayerChannels &
AQ_BP_QuestManager.
This video will explain how to Setup your Player Character and how the Event system works.
⚠️ You will also need to either change the Mapping Context to AQ_IMC to use the Plugin's Mapping Context or add the two input Actions in your own Mapping Context: AQ_IA_OpenJournal & AQ_IA_Save.
Your First Quest
When deciding to create a quest using the Quest Tool, there are a few important considerations.
Here's a step-by-step guide to ensure you use the tool properly.
⚠️ 1. The Quest Giver MUST be an actor within the world and not an asset within the content drawer.
⚠️ 2. When an objective is either COLLECT or DELIVER you
MUST write the exact name of the Item or QuestItem name as it is listed in the content drawer.
⚠️ 3. When using the UNIQUE specifier, you are restricted to selecting an actor
within
the world only.
This constraint arises from the necessity to add the Unique Component to the chosen target.
⚠️ 4. You may encounter an Error Prompt if you are selecting an actor & an asset in the same time. To resolve this issue you just have to be sure that no assets are selected within the content drawer. You can click anywhere in the content drawer to unselect.
Objective Types
There are many Objective Types that Advanced Quest offers, each with its own specificities. Let's delve
into each one!
COLLECT
To fulfill this objective, the player must loot items, which can be either regular Items or Quest Items.
If the objective specifies a Quest Item as the target, all the quest items in the player's
inventory will be removed upon completing the quest.
If the objective specifies an Item as target, the player will retain all such items in its
inventory.
Examples: Collecting resources from around the world, defeating creatures to loot items.
DELIVER
At the beginning of a delivery quest, the player will receive an item to deliver to the Quest
Receiver.
Upon completion, the item will be removed from the player's inventory.
Delivery quests are automatically validated from the start if delivery is the sole objective.
Examples: Bring [item] to [Quest Receiver]
Bonus: By setting the target to empty and the amount to 0, you can create quests like "Go meet Kalghan in
the Guard Tower" that don't necessitate specific completion criteria.
INTERACT
Interaction possibilities are incredibly diverse; any interaction within your world can be designated as an
objective.
Example: opening a door, unlocking a chest, drinking a beer, engaging in conversation with an NPC, or toggling a button on/off— the possibilities are practically endless.
KILL
The Player must defeat a specified number and type of enemies to complete the objective.
Example: Defeat [x] renegats, Slain the chief of the renegats.
Bonus: Note that if your class target is "Renegats", any child of this class will complete the
objective.
For instance, if you have War, Mage, and Thief as child classes of Renegats, defeating any of them will
complete the objective.
If you want separate objectives for each child class, you need to target the specific child class per
objective, resulting in something like:
Defeat [x] war Renegats,
Defeat [x] mage Renegats,
Defeat [x] thief Renegats
PROTECT
Protect objectives involve safeguarding a target, often an NPC or location or even a structure, from
harm.
Player must ensure the designated entity survives until the quest concludes.
If the target dies, the quest will be deemed failed, and the player will need to abandon it
to try again.
Example: Ensure the safety of the village chief during the impending orc raid.
LOCATION
Location objectives require players to reach or explore a specific area in the game world.
Once the player arrives at the designated location, the objective is considered accomplished.
Example: Reach the hidden cavern at the top of Mount Everpeak.
MINI GAMES
Mini Games objectives involve completing specific tasks or challenges within the game that go beyond
standard interactions or combat scenarios. These can include puzzles, races, or other skill-based
activities.
Example: Solve the ancient puzzle in the Forbidden Temple to progress in the quest.
PLAYER LEVEL UP
Player Level Up objectives require the player to reach a specified character level to complete the quest.
This encourages character progression and development.
Example: Attain level 10 to unlock the next phase of your adventurer's journey.
Note: Similar categories can be created to monitor various player statistics, including professions level, skills level, and more.
⚠️ Important: These categories form a solid foundation, but it's crucial to note that you can
effortlessly expand them to incorporate additional categories based on your specific requirements and
preferences.
The system is intentionally designed to be flexible and adaptable, catering to a diverse
range of customization possibilities.
I will soon release a tutorial video demonstrating how to expand these categories, especially aimed at
assisting designers who may not be familiar with C++.
Specifiers
There are two important aspects to understand regarding specifiers: a target can be either a UNIQUE target or a default target.
Unique
Only the specifically selected target will satisfy the objective. For example, if you have
multiple doors in your level but you want the objective to be completed only when
there is an interaction with THIS particular door and not any other, then you must use the unique
specifier.
When the Unique specifier is selected, the Unique ID Component will be added to the selected
target.
⚠️ Important: Do not tamper with IDs, whether it's the Quest's ID, Quest Items IDs, or Unique IDs.
It is crucial to comprehend that the entire system relies on these IDs.
All queries and checks are dependent on them, so if you overwrite IDs, you may encounter issues with your
quests.
-> A debug tool will be implemented in the next updates to identify any quests that are not correctly
implemented within the world.
The main features of the tool will include:
- Checking if all the Quest Data from the Content Drawer are implemented within the world, with a clear list
of the ones that aren't.
- Checking all Quest Givers & Receivers to ensure their Quest IDs are valid and properly aligned with the
quests.
- Checking all Actors with Unique ID Components, confirming the validity of their IDs. Additionally, it
will ensure that quests with Unique Specifier Objectives have their targets properly situated within the
world.
- Checking if all the Quest Items have valid quest IDs referenced (if any).
Default
When selecting a default objective target, any child of this class will valid the objective.
Requirements
You have the freedom to choose whether or not you want to set requirements for each of your quests:
None: No Requirements.
Level: Specifies the minimum level required.
Quest: Specifies all the Quests that must be completed.
For the Level Requirement you just have to write an integer value.
For the Quest Requirement, you must write the exact name of the quest found within the Content
Drawer. For example: Quest_100345
This is crucial as the Custom Quest Tool will extract the ID by checking what comes after the '_'.
Note: In the upcoming version update, you will only need to write the ID to prevent errors.
However, for now, please use the format [QuestName]_[QuestID].
Rewards
Upon successful completion of the quest, players can receive the following rewards:
Experience Points (XP): Specify the amount of XP
Gold: Specify the amount of gold or currency
Items: List any items
If you choose to have items as rewards, ensure to write the exact Asset Name of the item.
For example: I_Bouquet (while the item itself is just called "Bouquet").
Any misspelling will result in empty Item Rewards as the tool relies on accurate Asset Names to locate the related Data Asset for each item.
To go further
Quest Items
The Quest Items class is a specialized subclass of Item Data, exclusively designed for quests.
A Collectable actor that has this Quest Item can remain in a dormant state, making it inaccessible for
player interaction until the quest initiation.
To enable this functionality, navigate to the Quest Item Data Asset and set its Quest ID to match the IDs of the corresponding quest. This establishes the link between the quest and the collectible, ensuring the proper activation conditions are met.
Trigger Events
In order to notify quests about interactions or events within the world, you need to get the
Player Channels Component and trigger the appropriate Event from it.
Here are two examples illustrating how to trigger the appropriate events to notify the active quests.
On the left, a Collectable actor that adds an item in the inventory (triggers COLLECT Event Type)
On the right, an Interactable actor (triggers INTERACT Event Type | OnEnvironmentEventNotify)
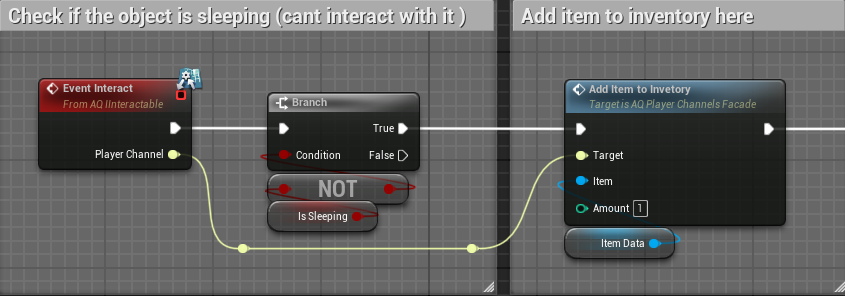
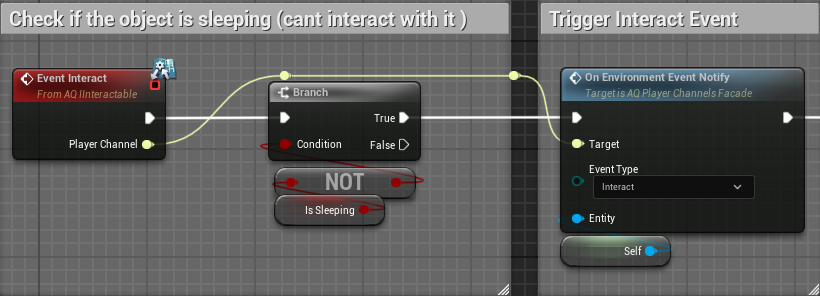
Note: Anything combat related would need to trigger an event within the OnCombatEventNotify.